Skip to content
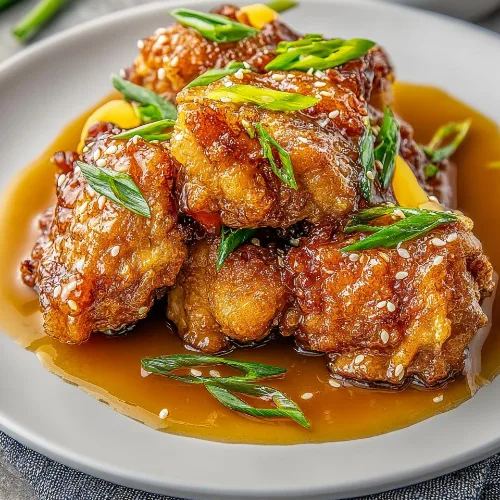
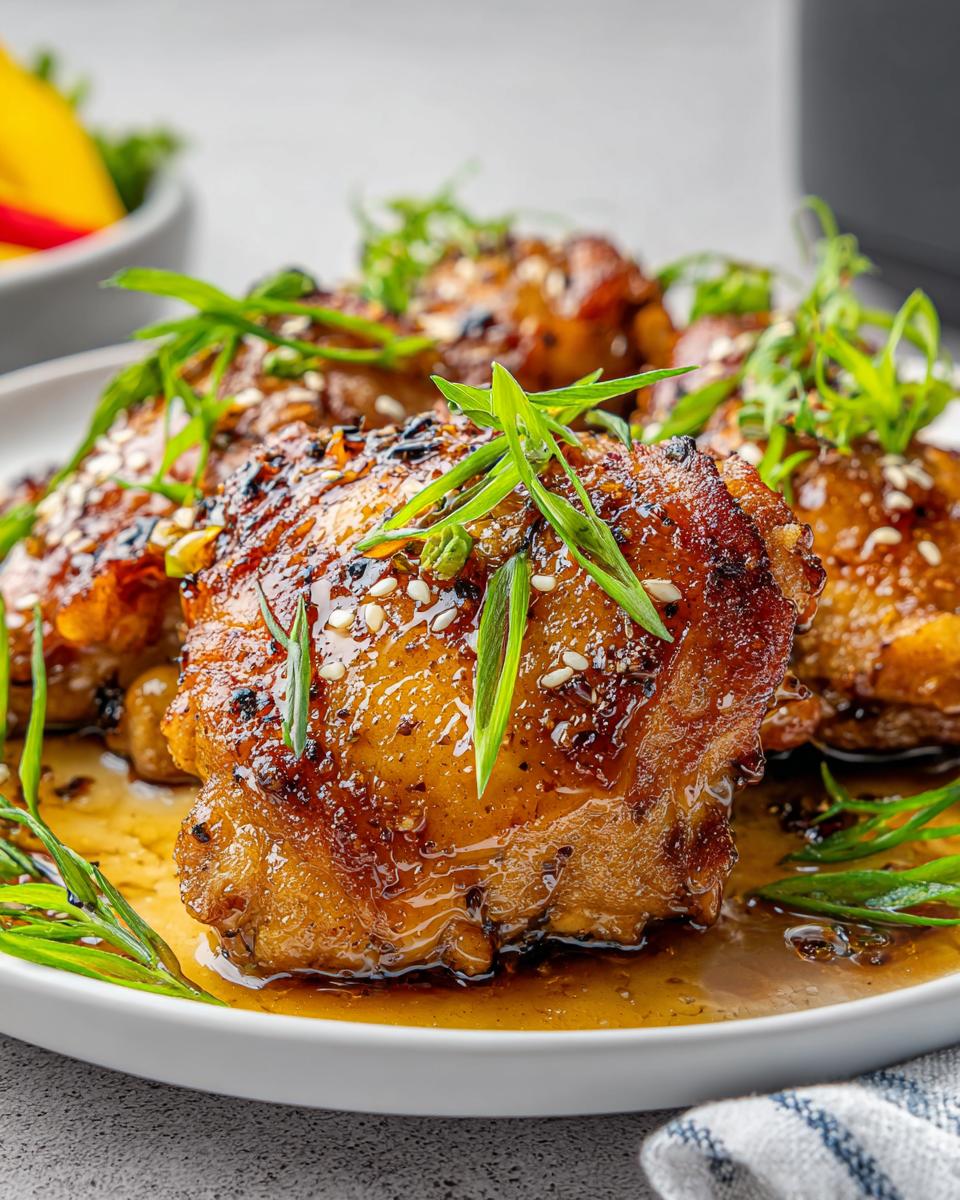
The glossy sheen of Sweet Savory Honey Garlic Chicken catches the light as it simmers. It releases a warm, caramelized aroma that blends sweet honey with savory garlic and a hint of ginger. This dish transforms simple chicken thighs into tender, crispy bites. The sticky sauce is both comforting and bold in flavor. It’s the kind of meal that feels indulgent. Yet, it doesn’t require hours in the kitchen.
Busy evenings call for recipes like this one. I know how rushed weeknights can feel as a mom juggling schedules. This comes together in just 30 minutes. It serves a family of four with ease. Leftovers reheat beautifully. They keep that crisp skin intact for lunches the next day. Everyone from kids to partners appreciates the balanced sweet-savory taste. It pairs perfectly with everyday sides.
Why You’ll Love this Recipe
- Crispy Exterior: The seared skin delivers a satisfying crunch. It contrasts beautifully with the tender meat inside.
- Quick Prep Time: Ready in under 30 minutes. It’s ideal for weeknight dinners without sacrificing flavor.
- Family Favorite: The sweet-savory glaze appeals to all ages. Optional heat suits spice lovers.
- Versatile Pairing: Complements rice or veggies effortlessly. It creates a complete, nourishing meal.
Sweet Savory Honey Garlic Chicken Ingredients
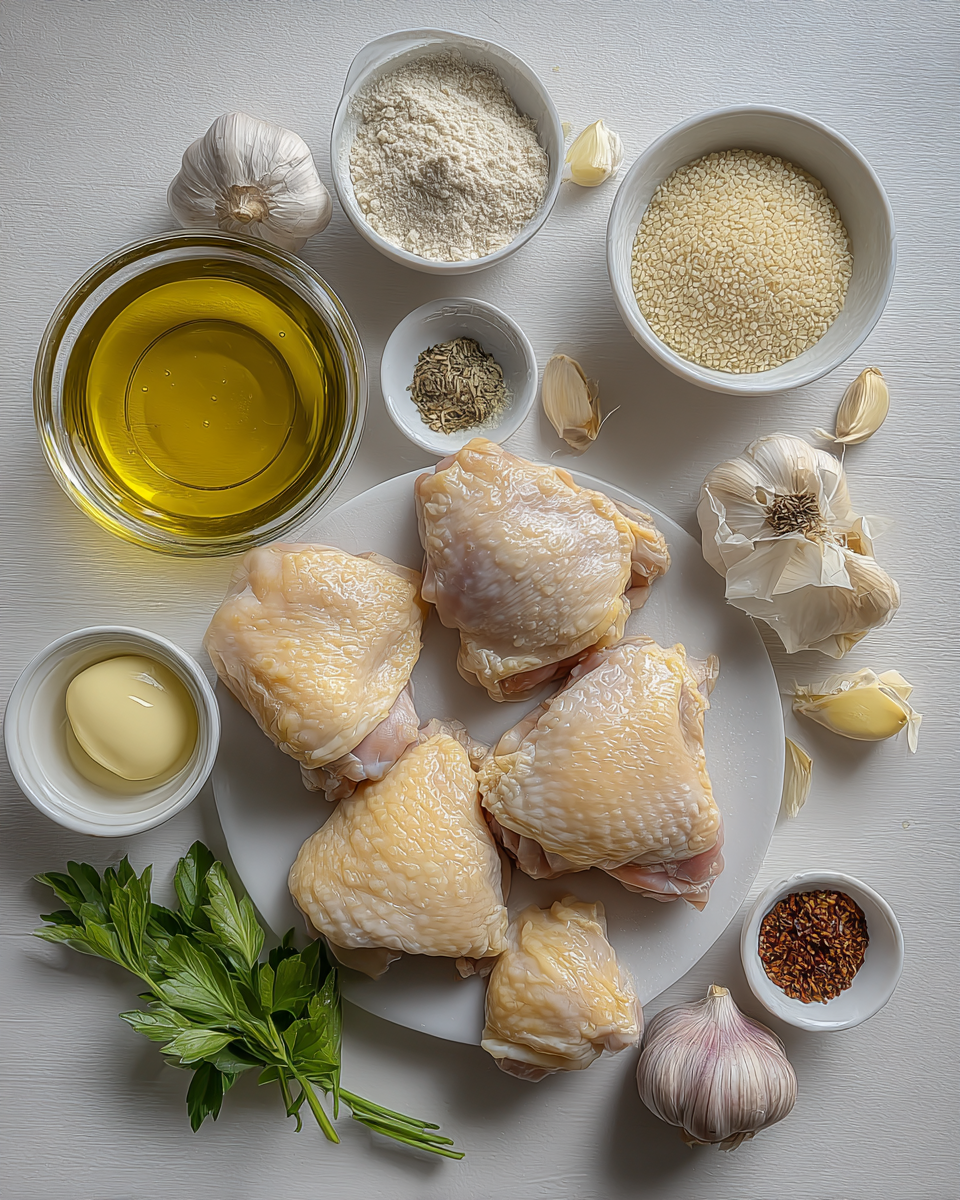
A harmonious blend of sweet honey, savory soy, and aromatic garlic creates a glaze. It elevates chicken to restaurant quality. I always opt for fresh ingredients. This ensures the sauce clings perfectly for maximum flavor. No more bland dinners after a long day.
- Bone-in skin-on chicken thighs: Provides juicy meat and crispy skin as the base for the dish. Use boneless if preferred for quicker cooking.
- Olive oil: Adds richness for searing and prevents sticking in the pan.
- Garlic powder: Infuses subtle earthy notes into the seasoning rub.
- Onion powder: Enhances depth and savoriness without fresh chopping.
- Black pepper: Brings mild heat and balances the sweetness.
- Kosher salt: Seasons the chicken for overall flavor enhancement.
- Low sodium soy sauce: Forms the umami backbone of the sauce. Tamari works as a gluten-free swap.
- Honey: Delivers natural sweetness that caramelizes into a glossy glaze.
- Sesame oil: Adds nutty aroma and authentic Asian-inspired flair.
- Garlic: Minced fresh for pungent, bold taste in the sauce.
- Fresh ginger: Grated for zesty warmth that cuts through the richness.
- Red pepper flakes: Optional for a spicy kick to customize heat levels.
- Cornstarch: Thickens the sauce into a syrupy consistency. Arrowroot powder is a clear alternative.
- Green onions: Chopped for fresh, bright garnish.
- Sesame seeds: Sprinkled on top for crunchy texture and visual appeal.
How to Make Sweet Savory Honey Garlic Chicken
Step 1: Prepare the Chicken
Pat the chicken thighs dry with paper towels. This promotes crisp skin. Then, drizzle with olive oil. Season evenly with garlic powder, onion powder, salt, and black pepper. Rub the seasonings all over each piece for full coverage. This step ensures flavorful, well-seasoned meat from the start. I skip it sometimes, but trust me, it makes a big difference.
Step 2: Sear the Chicken
Heat olive oil in a large skillet over medium-high. Wait until shimmering. Then, add the chicken skin-side down. Sear for 3-5 minutes until golden and crispy. Flip and cook the other side for 2-3 minutes. Transfer to a plate. This keeps the skin intact while building the sauce. The sizzle alone makes dinner exciting.
Step 3: Mix the Sauce
In a small bowl, whisk together soy sauce, honey, sesame oil, minced garlic, grated ginger, and red pepper flakes if using for heat. This creates a balanced sweet-savory base. It will glaze the chicken beautifully. Stir well to combine all flavors evenly. I prepare this while searing to save time.
Step 4: Simmer the Sauce Base
Drain excess fat from the skillet, leaving a thin layer. Then, return to medium heat. Pour in the sauce mixture. Bring to a gentle simmer. Stir frequently to deglaze the pan and infuse pan drippings. This builds depth in the honey garlic glaze. Those bits from searing add so much taste.
Step 5: Thicken the Sauce
Stir in the cornstarch slurry. Whisk constantly until the sauce reaches a glossy, syrupy thickness. This quick addition prevents a watery glaze. It ensures even coating on the chicken. Watch closely to avoid lumps during mixing. A little patience here pays off big.
Step 6: Glaze and Finish Cooking
Return the seared chicken to the skillet. Spoon sauce over each piece to coat thoroughly. Then, simmer for 5-7 minutes. Turn occasionally until cooked through. Check for an internal temperature of 165°F for safety. The result is tender chicken with a sticky, flavorful finish. Your kitchen will smell amazing.
Expert Baking Tips
- Pat Chicken Dry: Removing moisture ensures crispy skin. It doesn’t steam during searing.
- Use Fresh Ginger: Grate it finely for even distribution. It adds vibrant zing in the sauce.
- Check Internal Temp: Aim for 165°F. This guarantees juicy, safe chicken without overcooking.
- Adjust Heat Level: Add red pepper flakes gradually. Suit your family’s spice preference.
How to Serve Sweet Savory Honey Garlic Chicken
Garnishes
I love topping this dish with chopped green onions. They add a fresh, crisp contrast. Sesame seeds provide a nutty crunch that enhances the glaze. A sprinkle of cilantro adds herbal brightness. If you want an extra layer of flavor, try it. These simple touches make the plate look inviting. They taste even more vibrant too.
Side Dishes
Pair it with steamed white rice. It soaks up the glossy sauce. This creates a cozy, complete meal. Stir-fried broccoli or green beans bring tender-crisp vegetable balance. They complement the savory notes. For variety, a simple cucumber salad offers refreshing coolness. It contrasts the warm chicken perfectly.
Make Ahead and Storage
Storing Leftovers
I store leftovers in an airtight container in the fridge. They keep well for up to three days. They don’t lose much crispness. For longer storage, freeze portions in freezer bags. Do this for two to three months. Flatten them for quick thawing. This makes it easy to enjoy the dish throughout the week. No waste here.
Reheating
To reheat, I use the microwave on medium power. Do it in short bursts. Cover with a damp paper towel. This retains moisture and prevents drying. For best results, warm in a 350°F oven. Do this for 10-15 minutes, tented with foil. It revives the glaze. Either way, the chicken stays tender and flavorful. Just like fresh.
PrintEasy Sweet Savory Honey Garlic Chicken

Easy Sweet Savory Honey Garlic Chicken is a flavorful dish featuring bone-in chicken thighs seared to crispy perfection and glazed in a sweet, savory honey garlic sauce with hints of ginger and sesame.
- Prep Time: 10 minutes
- Cook Time: 20 minutes
- Total Time: 30 minutes
- Yield: 4 servings 1x
- Category: Main Dish
- Method: Pan-seared
- Cuisine: Asian-inspired
Ingredients
- 6 bone-in, skin-on chicken thighs (about 2 lbs)
- 1 tbsp olive oil, plus 2 tbsp for searing
- 1 tsp garlic powder
- 1/2 tsp onion powder
- 1/2 tsp black pepper
- 1/2 tsp kosher salt
- 1/4 cup low sodium soy sauce
- 1/2 cup honey
- 2 tsp sesame oil
- 4 cloves garlic, minced (about 1 tbsp)
- 1 tsp grated fresh ginger
- 1 tsp red pepper flakes (optional, for heat)
- 2 tsp cornstarch mixed with 1 tbsp cold water (for thickening)
- Chopped green onions and sesame seeds, for garnish
Instructions
- Pat the chicken thighs thoroughly dry with paper towels to ensure a crisp skin. Drizzle the chicken with 1 tablespoon of olive oil, then season generously with garlic powder, onion powder, kosher salt, and black pepper. Rub the seasonings evenly over each piece of chicken.
- Heat 2 tablespoons of olive oil in a large, heavy-bottomed skillet or cast iron pan over medium-high heat until shimmering. Carefully place the chicken thighs, skin-side down, into the hot pan. Sear for approximately 3-5 minutes until the skin is golden brown and crispy. Flip the chicken and sear for another 2-3 minutes on the other side. Transfer the seared chicken to a plate.
- In a small bowl, whisk together the soy sauce, honey, sesame oil, minced garlic, grated ginger, and red pepper flakes (if using).
- Carefully drain most of the excess fat from the skillet, leaving just a thin layer. Return the skillet to medium heat. Pour the honey-garlic sauce into the pan. Bring it to a gentle simmer, stirring frequently.
- Once simmering, add the cornstarch slurry (cornstarch mixed with cold water) to the sauce, whisking constantly until the sauce thickens to a glossy, syrupy consistency.
- Return the seared chicken thighs to the skillet, spooning the thickened sauce over each piece to coat thoroughly. Allow the chicken to simmer in the sauce for 5-7 minutes, turning occasionally, until the chicken is cooked through and glazed.
- Serve the sticky honey garlic chicken immediately, garnished with chopped green onions and sesame seeds. This dish pairs wonderfully with steamed rice and your favorite vegetables.
Notes
- Red pepper flakes are optional for those who prefer a spicy kick.
- Ensure chicken reaches an internal temperature of 165°F for safety.
Nutrition
- Serving Size: 1 chicken thigh with sauce
- Calories: 450
- Sugar: 20g
- Sodium: 600mg
- Fat: 25g
- Saturated Fat: 6g
- Unsaturated Fat: 15g
- Trans Fat: 0g
- Carbohydrates: 25g
- Fiber: 0g
- Protein: 30g
- Cholesterol: 120mg