Skip to content
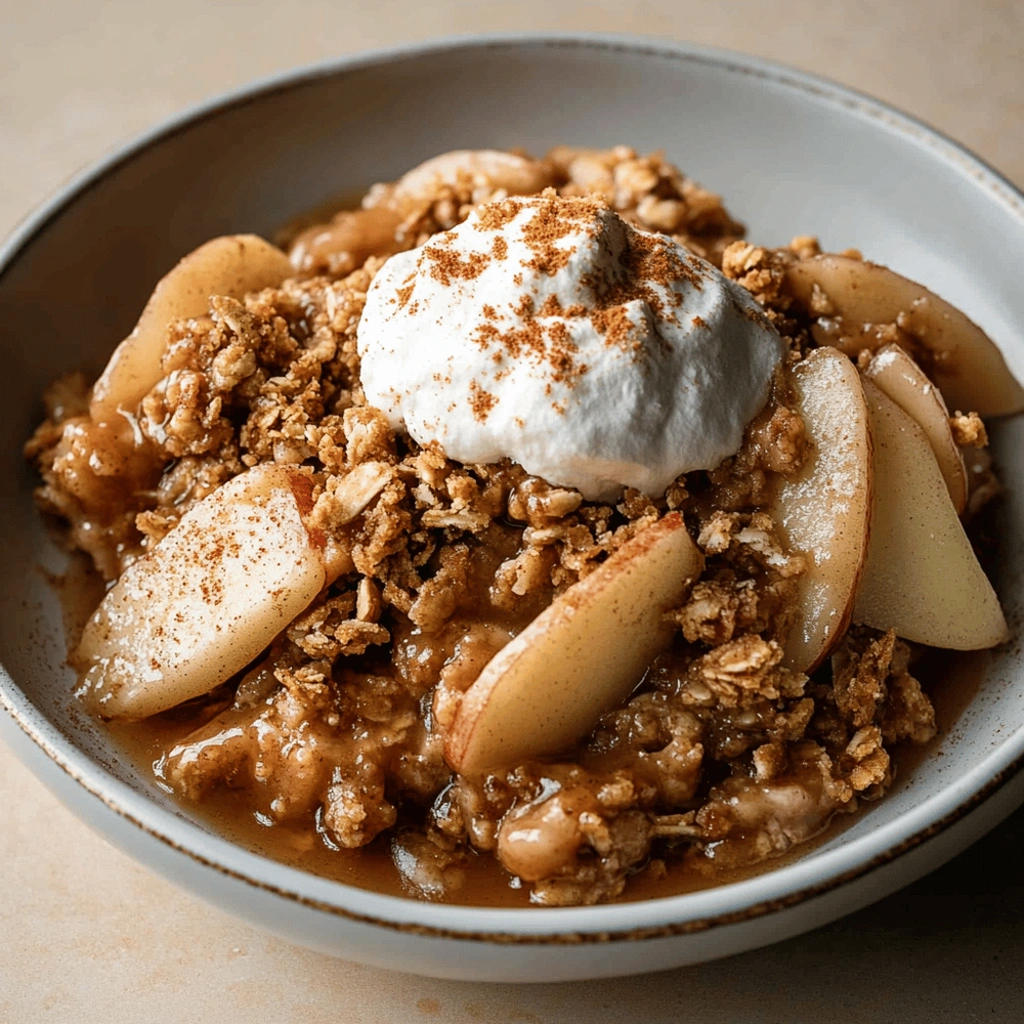
I’m absolutely thrilled to share with you what I confidently believe is the best Caramel Apple Crisp recipe you’ll ever make. This isn’t just any dessert; it’s a symphony of tender, cinnamon-spiced apples, luscious caramel, and a perfectly crumbly, buttery oat topping that will have everyone asking for seconds. It’s comforting, incredibly satisfying, and surprisingly simple to put together, making it ideal for busy evenings or special gatherings. My journey to perfect this Caramel Apple Crisp started years ago, trying to capture that quintessential fall flavor in a way that felt both gourmet and homey.
I’ve tested this Caramel Apple Crisp recipe over a dozen times, tweaking every element from the apple varieties to the caramel integration and the topping’s texture. The secret to its unparalleled success lies in how we layer the caramel within the apple filling, ensuring every bite gets that sweet, gooey goodness without making the crisp soggy. This unique approach guarantees a consistently delicious result that stands out from other apple crisps you might have tried.
Why You’ll Love This Recipe
You’re going to adore this Caramel Apple Crisp for so many reasons:
- Irresistible Flavor Combination: The sweet and tart apples meld perfectly with warm spices and rich caramel, creating a dessert that’s pure comfort in every bite.
- Effortless Elegance: Despite its gourmet taste, this Caramel Apple Crisp is surprisingly easy to prepare, making it perfect for both weeknight treats and impressive dinner party finales.
- Perfect Texture Contrast: Enjoy the tender, juicy apples beneath a golden, crunchy oat topping that provides a delightful textural experience.
- Make-Ahead Friendly: Prepare parts of this Caramel Apple Crisp in advance, saving you time when you need it most, especially during busy holidays or gatherings.
Ingredients You’ll Need
Gathering the right ingredients is the first step to creating this heavenly Caramel Apple Crisp. Each component plays a crucial role in building those layers of flavor and texture we love so much. I always say, good ingredients make a great dish, and this recipe is no exception! Don’t skimp on quality, especially for your apples and butter, as they are the stars of this show.
Here’s what you’ll need for your delicious Caramel Apple Crisp:
- Apples (6 medium): I love a mix of Granny Smith for tartness and Honeycrisp or Fuji for sweetness and firm texture. This blend ensures a balanced flavor and prevents the apples from turning to mush.
- Granulated Sugar (1/4 cup): Just enough to sweeten the apples without overpowering their natural flavor.
- All-Purpose Flour (1 tbsp for filling, 1 cup for topping): Helps thicken the apple juices in the filling and provides structure to our crumbly topping.
- Ground Cinnamon (1 tsp for filling, 1/2 tsp for topping): The quintessential fall spice that pairs beautifully with apples and caramel. Don’t skip it!
- Ground Nutmeg (1/4 tsp): A warm, aromatic spice that adds depth to the apple filling.
- Caramel Sauce (1/4 cup, plus more for drizzling): Store-bought is fine for convenience, but homemade takes this Caramel Apple Crisp to the next level. It’s the “caramel” in Caramel Apple Crisp, after all!
- Packed Light Brown Sugar (1/2 cup): Adds a rich, molasses-like sweetness and moisture to the topping, creating that perfect chewiness.
- Old-Fashioned Rolled Oats (1/2 cup): Essential for the classic crisp texture and a lovely nutty flavor. Quick oats can be used in a pinch, but rolled oats offer better texture.
- Salt (1/4 tsp): A tiny pinch enhances all the other flavors in the topping.
- Unsalted Butter (1/2 cup/1 stick), cold and cubed: Cold butter is key for a crumbly, tender topping. It creates pockets of steam that make the crisp light and airy.
- Optional: Vanilla Ice Cream or Whipped Cream: The perfect cool, creamy accompaniment to a warm Caramel Apple Crisp.
How to Make Caramel Apple Crisp
Making this delightful Caramel Apple Crisp is simpler than you might think! Follow these steps for a perfect dessert every time.
Step 1: Prepare Your Oven and Baking Dish
First things first, preheat your oven to 375°F (190°C). This ensures it’s perfectly hot when your Caramel Apple Crisp is ready to go in. Lightly butter an 8×8 inch or 9×9 inch baking dish. This little step helps prevent sticking and makes cleanup easier.
Step 2: Craft the Apple Filling
In a large bowl, combine your peeled, cored, and sliced apples. Add the granulated sugar, 1 tablespoon of all-purpose flour, 1 teaspoon of ground cinnamon, and the ground nutmeg. Gently toss these ingredients together until the apples are nicely coated. Now, stir in 1/4 cup of your chosen caramel sauce. This infuses the apples with that signature caramel flavor right from the start, making every bite of your Caramel Apple Crisp extra special.
Step 3: Arrange Apples in the Dish
Pour the apple mixture into your prepared baking dish. Spread it out evenly so that the apples cook consistently and the flavors meld beautifully. This layer is the heart of your Caramel Apple Crisp.
Step 4: Create the Crumbly Topping
In a separate medium bowl, combine 1 cup of all-purpose flour, the packed light brown sugar, old-fashioned rolled oats, 1/2 teaspoon of ground cinnamon, and the salt. Add the cold, cubed unsalted butter. Using your fingertips or a pastry blender, work the butter into the dry ingredients. Continue until the mixture resembles coarse crumbs. If you have a food processor, you can pulse it a few times for a quick and easy topping.
Step 5: Assemble and Bake
Sprinkle the prepared topping evenly over the apple mixture in the baking dish. Make sure it covers the apples completely for that perfect golden crust. Bake your Caramel Apple Crisp for 35-45 minutes. You’ll know it’s ready when the topping is golden brown and the apples underneath are tender and bubbly. If the topping starts browning too quickly, loosely tent the dish with aluminum foil.
Step 6: Cool and Serve Your Caramel Apple Crisp
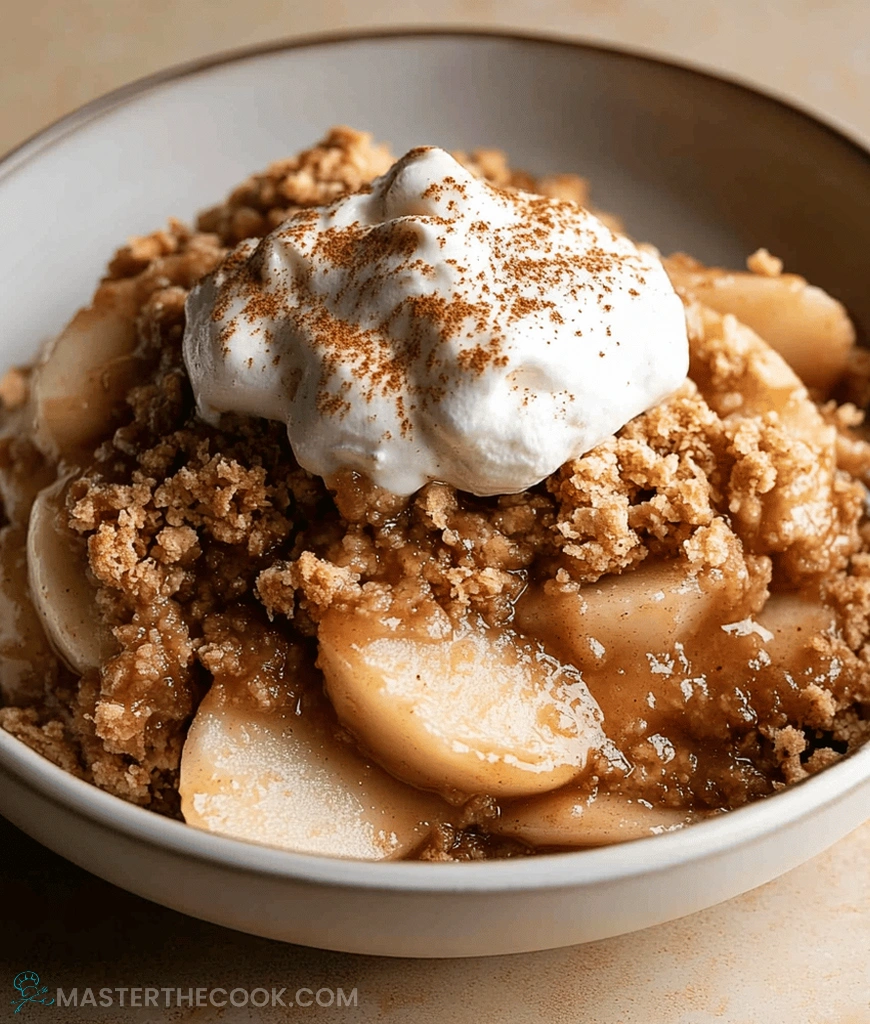
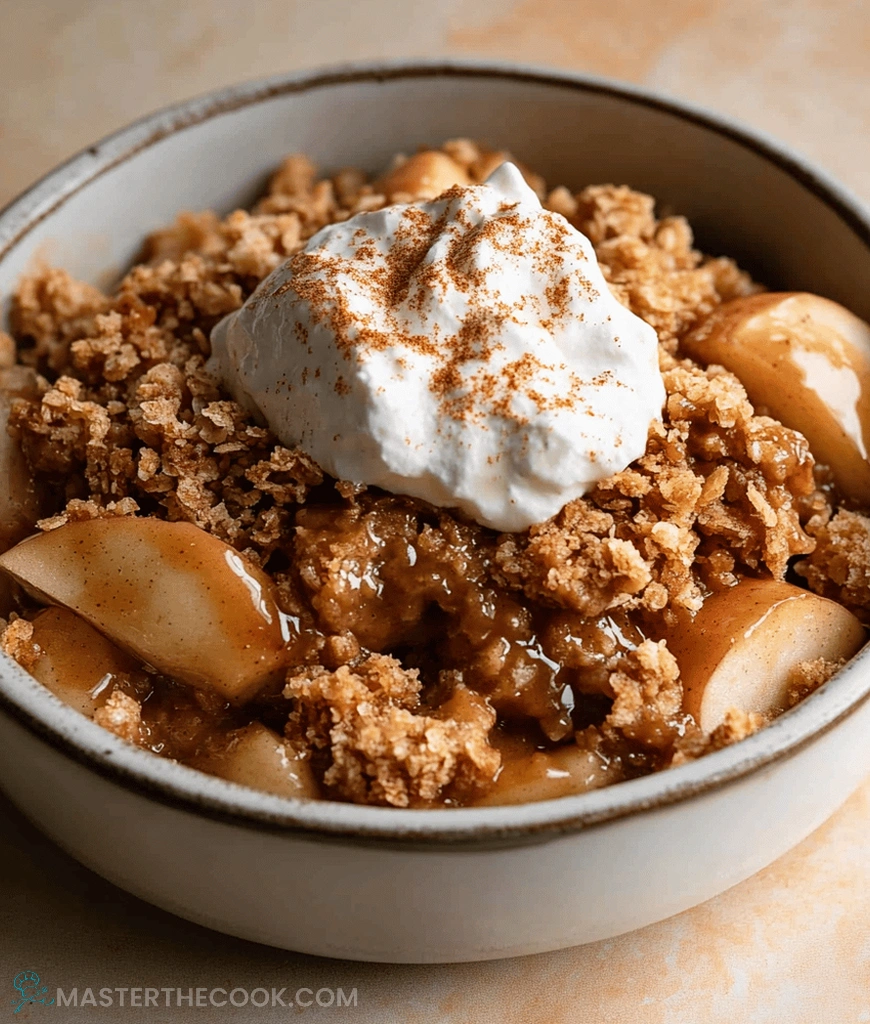
Once baked, remove the Caramel Apple Crisp from the oven. Let it cool for at least 15-20 minutes before serving. This crucial cooling time allows the filling to set slightly, preventing it from being too runny. Serve warm, with an extra drizzle of caramel sauce, and if you’re feeling indulgent, a scoop of vanilla ice cream or a dollop of whipped cream. Enjoy your homemade Caramel Apple Crisp!
Frequently Asked Questions
Can I make Caramel Apple Crisp ahead of time?
Absolutely! You can assemble the entire Caramel Apple Crisp, cover it tightly, and refrigerate it for up to 24 hours before baking. Just add about 10-15 minutes to the baking time if baking from cold.
What are the best apples for Caramel Apple Crisp?
For the best Caramel Apple Crisp, I recommend using a mix of sweet and tart apples like Granny Smith, Honeycrisp, Fuji, or Braeburn. This combination provides a balanced flavor and ensures the apples hold their shape well during baking.
How do I store leftover Caramel Apple Crisp?
Store any leftover Caramel Apple Crisp in an airtight container in the refrigerator for up to 3-4 days. For best results, reheat individual portions gently in the microwave or oven.
How to Serve Caramel Apple Crisp
Serving your homemade Caramel Apple Crisp is almost as fun as making it! Here are my favorite ways to present this comforting dessert to truly impress your family and friends.
Garnishes
To truly elevate your Caramel Apple Crisp, don’t forget the garnishes! A generous drizzle of extra caramel sauce is non-negotiable – it reinforces that rich, buttery flavor and adds a beautiful sheen. For a touch of freshness and color, a sprinkle of flaky sea salt can surprisingly enhance the caramel’s sweetness, creating a delightful sweet-and-salty contrast. A dollop of freshly whipped cream or a scoop of premium vanilla bean ice cream melting over the warm crisp is classic and adds a luxurious creaminess that perfectly balances the crisp’s texture.
Side Dishes
While Caramel Apple Crisp is a complete dessert on its own, a few simple accompaniments can make it even more special. A small bowl of plain Greek yogurt on the side offers a tangy contrast that cuts through the sweetness, making it feel a little lighter. For a truly indulgent experience, consider a small pitcher of warm vanilla custard or crème anglaise; its silky texture and delicate flavor beautifully complement the spiced apples and crunchy topping.
Creative Ways to Present
For a cozy family dinner, serving the Caramel Apple Crisp directly from the baking dish, allowing everyone to scoop their desired portion, feels wonderfully rustic and inviting. However, if you’re entertaining, individual ramekins are a fantastic option. Bake smaller portions of the Caramel Apple Crisp in individual dishes, ensuring each guest gets their own perfectly baked serving. Another charming idea is to serve slices of the crisp on small dessert plates, perhaps with a dusting of powdered sugar and a sprig of fresh mint for a pop of color, making each plate feel like a work of art.
Recipe Tips
- Preparation Tips: Slice your apples uniformly so they cook evenly. A mandoline can help, but a sharp knife works just fine. Don’t peel the apples if you prefer a bit more fiber and rustic texture, but I find peeling creates a more tender filling for this Caramel Apple Crisp.
- Cooking Techniques: If your topping browns too quickly, tent the dish loosely with foil. The apples should be tender but not mushy, so adjust baking time based on your oven and apple variety.
- Substitutions: Feel free to experiment with different fruit combinations! Pears or a mix of apples and pears would also be delicious in this Caramel Apple Crisp. For a gluten-free option, use a gluten-free all-purpose flour blend and certified gluten-free oats.
- Pro Tips: For an extra layer of flavor, toast your oats lightly before adding them to the topping mixture. This enhances their nutty taste and adds depth to your Caramel Apple Crisp.
Caramel Apple Crisp

A delightful Caramel Apple Crisp recipe featuring tender apples coated in cinnamon and caramel, topped with a buttery, crumbly oat topping. Perfect for a comforting dessert.
- Prep Time: 20 minutes
- Cook Time: 35-45 minutes
- Total Time: 55-65 minutes
- Yield: 6–8 servings 1x
- Category: Dessert
- Method: Baking
- Cuisine: American
- Diet: Vegetarian
Ingredients
- 6 medium apples (such as Granny Smith, Honeycrisp, or Fuji), peeled, cored, and sliced
- 1/4 cup granulated sugar
- 1 tbsp all-purpose flour
- 1 tsp ground cinnamon
- 1/4 tsp ground nutmeg
- 1/4 cup store-bought or homemade caramel sauce, plus more for drizzling
- 1 cup all-purpose flour
- 1/2 cup packed light brown sugar
- 1/2 cup old-fashioned rolled oats
- 1/2 tsp ground cinnamon
- 1/4 tsp salt
- 1/2 cup (1 stick) unsalted butter, cold and cut into cubes
- Optional: vanilla ice cream or whipped cream for serving
Instructions
- Preheat oven to 375°F (190°C). Lightly butter a 8×8 inch or 9×9 inch baking dish.
- Prepare the filling: In a large bowl, combine sliced apples, granulated sugar, 1 tablespoon flour, 1 teaspoon cinnamon, and nutmeg. Toss gently to coat. Stir in 1/4 cup caramel sauce.
- Pour the apple mixture into the prepared baking dish and spread evenly.
- Prepare the topping: In a separate medium bowl, combine 1 cup flour, brown sugar, oats, 1/2 teaspoon cinnamon, and salt. Add the cold butter cubes.
- Using your fingers or a pastry blender, cut the butter into the dry ingredients until coarse crumbs form. (Alternatively, you can pulse in a food processor a few times until crumbly).
- Sprinkle the topping evenly over the apple mixture in the baking dish.
- Bake for 35-45 minutes, or until the topping is golden brown and the apples are tender and bubbly. If the topping starts to brown too quickly, you can lightly tent it with foil.
- Remove from oven and let cool for at least 15-20 minutes before serving. This allows the filling to set slightly.
- Serve warm, drizzled with extra caramel sauce, and optionally with a scoop of vanilla ice cream or a dollop of whipped cream.
Notes
- For best results, use a mix of sweet and tart apples.
- If you don’t have a pastry blender, using your fingertips to rub the butter into the dry ingredients works well.
- Adjust the amount of caramel sauce to your preference.
- Leftovers can be stored in an airtight container in the refrigerator for up to 3-4 days.